Here's what I did with them.
First, paint the inside whatever color you want, I chose black.
After paint is dry, apply leafing adhesive over the entire front surface. I used Duo Embellishing Adhesive from U S Artquest, however, any type of dries sticky adhesive will work.
As you can see in the photo the adhesive goes on white. IMPORTANT: The most important thing to remember when leafing is that your adhesive needs to be dried until it is completely transparent--if there's any white left, leaf won't stick properly. Don't worry, the adhesive will stay sticky for a long time so there's no need to hurry.
Once the adhesive has dried completely transparent, it's time to apply your leafing. The leafing I use comes in a pack of 25-5.5"x5.5" sheets, with each sheet separated by paper. Picking up the leaf and applying it is very difficult so I found that by opening up the pack as shown below and laying the votive against the leaf and then rolling it to cover works the best.
If you're wondering whats on the votive in this photo, it's pieces of leftover leaf sprinkled on randomly so my finish would have a varigated look. NOTE: Don't throw away any of your leafing scraps--no matter the size they are still useable.
Once the entire surface is covered, tear away and save any left over pieces.
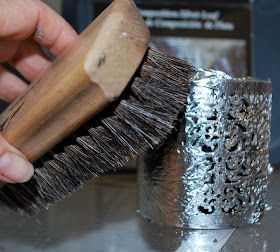
Next, using a soft brush, lightly burnish over the entire piece. In the photo I show a brush being used against the votive which is what I did, however, I went outside and did it in the breeze so the wind would carry the excess away. With all the holes, there was a lot of brush off and I didn't want it flying all over the place.
Once the leaf was how I wanted it, I antiqued it with alcohol ink. The silver will eventually tarnish but I wanted immediate aging so I used my mushroom colored Alcohol ink and blending solution by Ranger. Simply apply the ink to your applicator and tap over the votive until you get the desired look.
At this point you can either seal the leafing with a top coat sealer or let it age awhile and then seal. I'll seal after it ages.
After I got the votives how I wanted, I pulled an old silver tray and two glass hurricanes from my latest thrift store and garage sale trips. I put the hurricanes over the two tallest votives and added a doily for the smallest one to sit on. I tied ribbon around the hurricanes and added a few other embellishments to decorate the tray.
Here's a few photos of the finished project during the day and then lit at night. I think the silver leaf turned these votives into something so much prettier than the boring beige color they were before, don't you agree? I'd love your opinion.


wow - what a beautiful project. I have some of that book style leafing, but in gold. The flakes are all the rage here at the moment (i'm in the UK), so have a couple of different colours of that - one particular company (called Indigo Blu, based in the UK) has about 12 different colour collections of flakes - if you haven't already seen them, you'll be blown away by the colours. I have to admit that I haven't used either the sheets or the flakes in any projects yet - but the more I see, the more I'm inspired to use them on something. Hope you don't mind if I also pin this project on to my pinterest boards - it will then be seen by others who may also come and visit your blog...
ReplyDeleteKind regards,
Paula x x x
wow - they look a bit different from the thrift store finds they were originally... drab to fab lol...
ReplyDeleteHope you don't mind, but I've pinned this too - I've also put a link on so that people can come and read the full tutorial if they like...
Paula x x x